Showing posts with label Guest Designer. Show all posts

Friday, June 3, 2011

Inking It Up Crazy Birthday Bash Guest Design

Happy Birthday Kassidy!  It's a Birthday Bash all month long at Inking It Up Crazy!  Kassidy is celebrating her Birthday in style with all her friends!  There are giveaways and guest designers everyday in June so stop by and join in the fun!
I am so excited about Guest Designing again this month for Kassidy!  Today Kassidy's favorite item is Brads & Eyelets!  I love making bags and boxes, so I was thrilled when I heard my assignment!  Here is my brads/eyelets project!
I made a set of 3x3 whale cards with a matching bag to hold them!

The large whales were cut at 7.5", layered, outlined, stickled and I added button shaped brads for the eyes!  I made a simple box and attached the two whales to it to form the bag.

I used Stampin' Up! Jumbo Eyelets to attach the handles to the bag.  I was trying to catch a picture of this Hand Dyed Crinkle Ribbon.  It is Black Diamond from My Craft Spot and I love it because it has a fine mist of glitter on it!  It looks fantastic in person!

The whales on the cards are cut at 2.65", layered, outlined, stickled, and I added small black brads for the eyes.  The background is embossed with the Tiny Bubbles Cuttlebug folder, then I added eyelets, bakers twine and a blue button.  The tag is hand cut, stitched and stamped with "smile" from My Craft Spot's Inside & Out Set #1.

I added a lot of Dimensionals to get my layers, so many layers that these cards are hard to fit in the envelopes, but they sure are cute!

Products Used:
  • Bazzill Cardstock
  • Create A Critter Cricut Cartridge
  • My Craft Spot Black Diamond Crinkle Ribbon
  • My Craft Spot Baby Blue Bakers Twine
  • My Craft Spot Inside & Out Set #1
  • Cuttlebug Tiny Bubbles Embossing Folder
  • Stampin' Up! Jumbo Brads and Journaler pen
  • Brads and Buttons from Michael's
  • Stickles
Make sure you swing by Inking it Up Crazy, check out her giveaway for today and wish Kassidy a very Happy Birthday Month!  Thank you Kassidy for having me today and have a wonderful and fun month long Birthday Bash!  Thanks for stopping by!

Monday, May 30, 2011

Fantabulous Cricut Challenge Me Monday Guest Designer

Hello everyone!  Welcome to my Guest Designer Project for this week's Challenge Me Monday at Fantabulous Cricut Challenge Blog!  I am so excited to be joining the amazing FCCB Design Team today!  The challenge for this week's Challenge #62 is Remember This!  Make something to remember a special person, time or anniversary.  The second I saw this challenge, my mind immediately went to my Oldest E's Preschool Graduation!  I wanted to make her something special to give to her (besides her scrapbook) to remember her early school days!  Here is what I came up with!
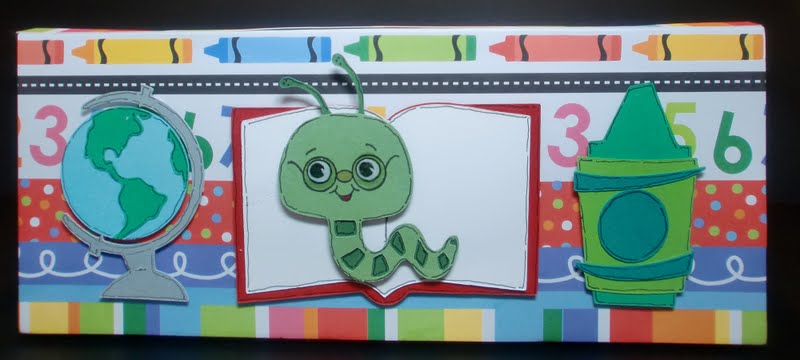
I made a Memory Box to hold a picture book for each school year (Preschool - Fifth Grade)! 

I found this box in my Yard Sale junk box!  It had some cards in it which I can still sell but the sturdy box was exactly what I was looking for!

I used Mod-Podge to cover the lid of the box with this fun School Days Paper!

I added little school themed Cricut cuts to all four sides of the box!

I used one of my favorite embellishments, Bakers Twine from My Craft Spot!

All of the Cricut cuts are outlined and popped up...

and I even managed to get my favorite little bookworm on here!  I like to add Crystal Effects to his glasses to make them look more realistic!

Here are the cuts on the ends of the box.

The little school bus with the stamp across the bus was inspired by my very talented friend Kate (I told you I  was going to be borrowing the idea too...hehe)!   Her little bus is much cuter with little kiddos and everything but I really loved the stamped idea!  Thanks Kate!

I used vinyl on the top of the box so that I don't have to worry about the top being torn up when getting store!  i'm sure eventually there will be stuff stacked on top!

I am so proud of myself for even getting all the little books prepared!  There is one for each school year Preschool through 5th grade (that is all the further the paper pad went up too).  Each book has 6 blank pages to add pictures/comments (front and back) so I figured I can get about 12 events in each book!  Her Preschool book is already mostly done (except for a few pics that need printed)!  Most of the pictures include classmates so I can't show you the inside of the book without having to blur out most of it but you get the idea!
Products Used:
  • Me & My Big Idea School Days Paper Pad
  • Stampin' Up! Cardstock and Crystal Effects
  • Locker Talk Cricut Cartridge
  • Plantin School Book Cricut Cartridge
  • Doodlecharms Cricut Cartridge
  • Create A Critter Cricut Cartridge
  • My Craft Spot Bakers Twine
  • Peachy Keen Critter Face Stamp Set
  • Pink By Design Simply Everything Stamp Set
  • Expressions Vinyl
Other Challenges:
The Paper Variety #35 School Week

Stop by Fantabulous Cricut this week to see all the wonderful inspiration from the Design Team and please join us for Challenge Me Monday !   I can't wait to see what everyone comes up with for their "Remember This" project!  Thank you so much FCCB for having me as your Guest Designer this week and thank you everyone for your support!

Wednesday, April 6, 2011

Inking it Up Crazy Birthday Week

Goodmorning my crafty friends!  I was so, so excited when my very talented friend Kassidy invited me to join her and her friends as a Guest Designer for Birthday Week at Inking it Up Crazy!  She is celebrating all week long with inspiration for everything birthday related!  Come check out all the creative projects all this week!

  I was asked to create a Birthday Favor for Birthday Week!  I had summer swimming parties on my mind so I created a personalized sand bucket/beach towel favor!
 My middle E is lucky enough to have a summer birthday and after attending her BFFs Pink Flamingo Party last month, she put in her request for a Pink Flamingo Birthday Party!  I am so excited I get to re-create all the fun (not to mention the cute LO I made for her friend, SEE HERE) 
I love how easy and fun it is to work with vinyl!  I order mine from Expression Vinyl and for this project I use the outdoor vinyl (because the buckets are going to be spending a lot of time in water).  When cutting vinyl, you need to have your Cricut set at Speed 3, Pressure 3, and your Blade set at 3.  You want to cut the vinyl and not the backing. 
 Set up your vinyl on a very tacky mat and start cutting.  After cutting, I trim away the un-cut areas of vinyl so I can use it again. 
Peel off the portion of vinyl that is not part of your cut image making sure you get all those holes and slivers.  Use your choice of transfer paper to pick up the individual cuts and carefully layer them.
 Then apply them evenly to the bucket.
 I turn off the Paper Saver for my lettering because then you can easily pick up the names in one, even shot and apply them!
Of course, I am never happy with what I make so I had to move my letters around several times. 
 Add a Thank You Tag, fill your bucket and you've got yourself a cute Birthday Favor!
Products Used:
  • Bucket from Michael's
  • Towel from Target
  • Vinyl from Expression Vinyl
  • Life is a Beach Cricut Cartridge
  • Tags, Bags, Boxes & More Cricut Cartridge
  • Stampin' Up! CS, Ribbon and Family Phrases Stamp Set
Thanks for stopping by!  Please join us at Inking it Up Crazy for a fun Birthday week! Kassidy has a whole team of awesome Designers lined up to share their Birthday creations!  Thanks Kassidy!