Showing posts with label Peachy Keen. Show all posts

Tuesday, September 4, 2012

My Craft Spot Stamp Release Party Day 2 - Spooky Treats

Good morning everyone!  Day 2 of the week long Stamp Release Party at My Craft Spot!  Today we are sneak peeking another great stamp set!  This set is called Spooky Treats and what a SPOOKY set it is!  We LOVE Halloween at our house!  It is one of those holidays that we have so much fun being creative with fun decorations and special treats for our family and friends!  I used the fun Spooky Treats stamp set to create this years Halloween party invitations!  Here is my sneak peek for today!

I made a simple pocket on the invites by zig zag sewing around the edges and slide in a little ghost with our party info into them!  I finished them off with a strip of Smokey Black Crinkle Ribbon!

The little ghosts are cut from the Simply Charmed Cricut Cartridge, outlined in black pen and stamoed with a little Peachy Keen Face.  I love the font on the new Spooky Treats stamp set!  I stamped the ghost with "Stop by for a Spell" and the "Oct 31st" I stamp on a curve!  The "Time:" and "Place:" stamps are from last years My Craft Spot Halloween set Candy Corn Kisses. 

The "Happy Halloween" is also from Spooky Treats which I stamped, cut out using my oval spellbinders and outlined with a black pen.  My 5 year old said the ziggy lines make it look like it is wiggling...hehe!
 
All the pattern papers are from Making Memories Spooky Alley 8x8 pad.


I hope you enjoyed my sneak peek of the new Spooky Treats stamp set!  There are more amazing sneak peeks from Kimberly and the Design Team over at My Craft Spot and a chance to win a fun prize!  All the new sets will be revealed and available for purchase on Saturday along with our fun Blog Hop!  Thanks for stopping by today and please stop back again tomorrow!

Sunday, July 10, 2011

Get Whale Wishes for Angelo

The challenge is still open for another 2 days to make Get Well cards for little Angelo.  If you missed it, the Whimsical Wednesday Design Team had created cards for Angelo, who is the 15 month old grandson of fellow blogger Margie, from Bella Bug Creations.  Angelo recently underwent brain surgery and is going through chemotherapy.   We are trying to bring some cheer to him and his family. The day I saw this challenge, I knew I wanted to be a part of this!  As, a mother, I couldn't even imagine going through what they as a family are going through right now.  I give thanks that my children have been blessed with good health.  My hope is that my card can bring at least a small amount of joy to him and his family.  Here is what I created.

I wanted to make something bright and cheerful for little Angelo!  Something that will catch his eye and something that is always smiling at him!

There are several layers stacked full of fun sea animals!  I almost added some more elements but then I remembered Angelo is only 15 months old and I didn't want anything on there that he could choke on.     

The inspiration for this fun card came from my good friend Dr. Sonia at Cards, Crafts and Kids Projects!   My girls have been wanting to make a tunnel card just like Sonia and her dear little assistant's card!  They were too busy to help with it today so I decided that I would try to make a different card inspired by her tunnel card.   Her card is much more elaborate and the card the girls & I are making together follow her wonderful step-by-step tutorial!  Thank you for the beautiful idea Sonia!  I'm glad I could use this idea for this very special project!

Products Used:
  • Stampin' Up! 
    • Brights Collection Cardstock
    • StazOn Ink
    • Black Stampin' Write
    • Pretty in Pink Pastel
    • Dimensionals
  • Cricut E2 and Gypsy
    • Create A Critter
    • Once Upon a Princess (for the frames in each layer)
  • My Craft Spot Bakers Twine
  • Peachy Keen Everyday Character Faces
  • My Pink Stamper Stamp
  • Signo White Gel Pen
  • Helmar Zapdots
  • Google Eyes 

Right now, there are only 18 participants and we would LOVE to see more!  I hope some of you can find the time in the next day to make a card to brighten the day of this sweet little guy!  Please check out the challenge at Whimsical Wednesday and link up your card to send to Angelo!  I'm sure Angelo and his family will appreciate it!   Thanks for stopping by!

Wednesday, June 15, 2011

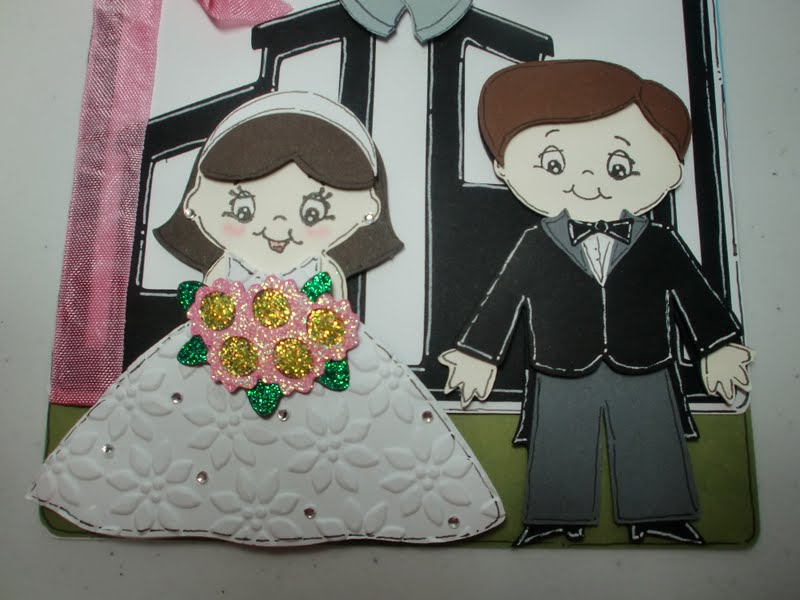
"Going to the Chapel and We're Gonna Get Married" Card

I needed a card for an upcoming wedding.  They are a younger couple so I wanted something fun!  I love when I make a card that puts a smile on my face, especially this week!  While making this card, I could not stop singing "Going to the chapel and we're gonna get married" (Click HERE if you would like to get the song stuck in your head too)! 
I used Inspired Hearts Cartridge for the background and Simply Charmed for the bride and groom.  I do not have a cart with bells so I made my own with a scrap of silver shimmer paper.

The card front is mostly black and white with a splash of pink (their wedding color).  The blue and green that you can see are on the inside of the card.  I used my Gypsy to stretch the background piece from Inspired Heart and then welded it to the front piece.

The bride and groom both have a few layers pieced with dimensionals and I gave them each a Peachy face!

The bride's dress is embossed and I added little rhinestones.  I also gave her a set of earrings and used stickles to make her bouquet sparkle.

Here you can see a little of the dimension and you can see how the happy couple are free standing on the front of the card.

Products Used:
  • Stampin' Up!
    • Tempting Turquiose Cardstock
    • Old Olive Cardstock
    • Whisper White Cardstock
    • Basic Black Cardstock
    • Gray Cardstock
    • Basic Black Classic Ink
    • Pastels (cheeks)
    • Petals A Plenty Embossing Folder
    • Dimensionals
  • Cricut E2 and Gypsy
    • Inspired Hearts Cartridge
    • Simply Charmed
  • My Craft Spot
    • Pink Bubblegum Hand Dyed Crinkle Ribbon
    • Click (HERE) to order
  • Peachy Keen Stamps
    • Wide Eyed Kids Stamp Set
  • My Pink Stamper
    • Pinka-licious Puns Stamp Set
  • Recollections Rhinestones
  • Journaling Pen
  • Signo White Gel Pen
  • Stickles
Challenges:
FCCB Challenge Me Monday #64 Wedding Include White and Bells
Die Cuttin Divas Challenge 19 Wedding Bliss Card with No Hearts

Thanks for stopping by!

Monday, May 16, 2011

My Craft Spot Monday Challenge #8 - Congratulations

It's Monday and another fun challenge at My Craft Spot!  The Monday Challenge this week is to make a Congratulations project!  I already showed everyone the Graduation Congratulation cards I'm working on last week so I thought I would make a Congratulations card for a friend who is heading to the State Police Academy this summer. 

I used stamps from Inside & Out Set #1 for this card.  I had to make a slight adjustment to the wording but it really was the perfect stamp for this card!   

Here is a view of the inside stamp! 

I used a strip of Chocolate Chip Crinkle Ribbon as a little accent.  At first, I was not too thrilled with this card but my husband loved it.  He said the colors were very masculine and now it is starting to grow on me.  I guess if my husband likes it, then his friend will too! 

Products Used:
  • Stampin' Up! Cardstock
  • Tim Holtz Paper
  • Everyday Paper Dolls
  • My Craft Spot Inside & Out Set #1 Stamp Set
  • My Craft Spot Hand Dyed Crinkle Ribbon
  • Peachy Keen Wide Eyed Kids Stamp Set
There's a wonderful prize for you this week, so link up your Congratulations projects to My Craft Spot for your chance to win!  Thanks for stopping by!

Saturday, May 7, 2011

Teacher Appreciation Blog Hop

Hello Everyone!  Welcome to the Teacher Appreciation Blog Hop!  It is that time of year that we are saying "thank you" to all those wonderful teachers that touch our lives and help mold the minds of our little ones!  I am so excited to be a part of Jen's hop today!  If you are coming from Lisa's Crop & Create then you are heading in the right direction.  If you just happen to be stopping by today and want to hop along, you'll want to start at Jen's blog, Jen's Craft Corner!  You don't want to miss out on the wonderful ideas and the fabulous blog candy!  Here are my Teacher Appreciation projects!

I made a very special little chalkboard bag for a very special teacher! 

Here is a view of the dimension!  I folded a strip of paper to make a ledge for the chalkboard.  Then I added a rolled piece of paper for the chalk and used different brands of pop dots on the book and the bookworm.

The bookworm was cut from Create A Critter and I added a Peachy Keen Critter Face.  For the lens on the glasses, I used a dot of Crystal Effects.  I love how they turned out!

I added Cherry Red Baker's Twine from My Craft Spot as an accent to the bag!

I made a set of simple note cards to fill the bag!  I left them blank so the teacher can use them for anything!

My second project are quick little items for the support teachers and helpers. 

They are post-it note books made using the same little bookworm and a cute background paper!

Here is the side view of the post-it note books!

and last but certainly not the least, I made these little cards for my kiddos Sunday School and Awana teachers. 

They are all volunteers and they do it for the love of the Lord and for the love of the children!  I just had to make a special thank you for them so they know they are appreciated too! 

Products Used:
Chalkboard Bag and Card Set
  • Stampin' Up! Cardstock, Red Polka-Dot Ribbon, Jumbo Eyelets, Button, Crystal Effects
  • My Craft Spot Cherry Red Baker's Twine
  • Bo Bunny Double Dot Paper
  • Create A Critter Cricut Cartridge
  • Peachy Keen Critter Faces Stamp Set
  • My Creative Time I Believe in Leprechauns Stamp Set
  • White Signo Gel Pen
Post-it Note Books
  • Stampin' Up! Cardstock, Red Gingham Ribbon
  • SU! Oval and Scalloped Oval Punches, Crystal Effects
  • Me & My Big Ideas School Days Paper
  • My Craft Spot Cherry Red Baker's Twine
  • Create A Critter Cricut Cartridge
  • Peachy Keen Critter Faces Stamp Set
  • My Creative Time I Believe in Leprechauns Stamp Set
Jesus Loves the Children Card
  • Stampin' Up! Whisper White Card Stock and Scalloped Border Punch
  • Paper/Envies are a note set from Target
  • My Craft Spot Black Licorice Baker's Twine
  • Car Decals Cricut Cartridge
  • My Pink Stamper More Faithful Sayings Stamp Set
Now are you ready for some BLOG CANDY!!  This is my first Blog Hop so I wanted to make it special.  The first item I am giving away is a set of my most favorite embellishment...Hand Dyed Crinkle Ribbon from My Craft Spot!!
One lucky winner will get their choice color set!  If you haven't seen all the gorgeous colors available you must check them out at My Craft Spot!!
The second item I am giving away is a More Punny-licious stamp set from My Pink Stamper!
In order to enter the drawings you must leave a comment below and tell me about a special teacher in your life!  You do not have to be a follower but I would love if you were!  I truly appreciate all of my followers so if you are a follower, you can add a second comment for a second chance to win!!  Easy enough!  I will pick the two lucky winners on Monday May 9! 
Now hop on over to my very talented friend Rae at Wahoo Crafts for her creative Teacher Appreciation project!  I have listed the Hop line-up below just in case you get lost along the way! 
Amber - My 3 E Scrapbooking (YOU ARE HERE)
Rae - Wahoo Crafts (Your next stop)
Sonia - Scraps 4 Fun
Thanks for stopping by and hopping with me today!!  I hope you'll stop by again!

Saturday, April 9, 2011

Bunnies, Bunnies and more Bunnies

Hello Everyone!  I hope everyone had a lovely Saturday!  I have been working on Easter Card Orders today.  I can't wait to get these done so I can work on my own Easter projects!  These are some super simple Bunny cards that I am making for a large order!  They are not the most creative card, but I am making them in bulk, so they need to be simple(and they can't have anything that would require extra postage)!
This is the bunny from Create A Critter with a Peachy Keen Critter Face Stamp.  I gave him a little color using my Watercolor Crayons. 
Here is just a sampling of the cards!  I thought it would help reduce the hum drum of mass production by making them in different colors! 
After I get these done, I need to make another 15 dozen bunny ears for a local bakery.  I delivered the first 15 dz last Monday and they've about sold out of their bunnies already!  They are going to keep me busy! 
Once I get all these orders filled, I want to work on my treats for the girl's preschool.  I made these quirky little chicks last year for them.  Aren't they cute!  I used the Tags, Bags, Boxes & More Cart flower box for them with a nose from Paper Doll Dress Up.  I got the idea when I saw Large Chick Gift Boxes at Hallmark.  I knew I could make something like them.  I think I posted these on the Cricut Message Board last Easter. 
Products Used on Cards:
  • American Crafts Cardstock
  • Create A Critter Cricut Cartridge
  • PKS Critter Face Stamp Set
  • My Creative Time Color Me Happy Stamp Set
  • Stampin' Up! CS, Perfect Polka Dot Embossing Folder and Scallop Oval Punch
  • SU Watercolor Wonder Crayons, Blender Pen  
  • Martha Stewart Border Punch
Challenges:
Cooking With Cricut Bunny Hop Challenge
Jen's Craft Corner Hippity Hop Bunny Challenge
Creative Sisters Monday Challenge #5 Bunnies, Bunnies, Bunnies

Thanks for stopping by!  Make sure you stop back tomorrow for the new Birthday Sundaes Challenge!

Thursday, March 10, 2011

Sham-rockin' St. Patty's Day Card

Another card here using my scraps for Sonia's Use Your Scraps Challenge.  This one went together pretty quickly because I used the sketch from Peachy Keen Stamps.  If you are looking for a St. Patty's Day LO click here.  My only problem is that I can't decide which orientation looks better.  Which one do you like better #1 or #2?

       
I think I like #1 better!  Now I was quite surprised when I was finished because I realized this green I used for the card base was a very scrappy piece!  Looks like I've got some more work to do!  I'm going to cover it with a white mat on the inside!

Products Used:
  • Scrap Paper
  • Paper Dolls Dress Up Cricut Cartridge (Shamrock)
  • Twinkle Toes Cricut Cartridge (Music)
  • Peachy Keen Critter Faces Stamp Set
  • My Creative Time I Believe in Leprechauns Stamp Set
  • Stampin' Up Circle Punch
  • Michael's Glitter Ribbon (for some Bling)
  • Queen & Co. Nightfall Pearls (for a little more Bling)
  • Signo White Gel Pen
  • Stickles
Challenges:
Peachy Keen Stamps Sketch Challenge 47 Think Bling
Crafting with Christina Challenge #18 St. Patty's Day Theme
Paper Cutz Challenge #81 St. Patrick's Day
Scraps 4 Fun Use your Scraps Challenge

Thanks for stopping by today! 

Wednesday, March 9, 2011

Put on Your Dancing Shoes Card

I've been very, very busy today.  Since the maid (AKA Mommy) was sick last week, the monster we know as laundry has taken over the laundry room.  Today, my job was to tackle that never-ending job.  So far I've gotten 8 loads washed and put away but I still can't see my floor!  Looks like I'll be back at it tomorrow.  The girls and I also worked on disenfecting the house.  We don't want anyone else to get sick.  We make a game of it to see who can wipe the most door knobs, then the most light switches, who can clean the most phones, then the most toys, etc.  By making a game of it, everything seems to get wiped down twice which means less germies and they are so busy competing that I have plenty of time to do my cleaning!  It seems to work well! 
I still used my kids nap time to get some crafting done.  Here is one of the cards I got done.  This card is a cute little dancing bear made completely from scraps.  I'm still working on Sonia's challenge to use up my scraps.  I do miss my paper pads and my selection of SU paper, but I know once I use up most of those scraps, I'll have a great sense of accomplishment (and some free space to buy more paper...hehe)!  Here is my Twinkle Toes card!

Products Used:
  • Stampin' Up! Scraps of CS, Stampin' Write Markers and Scallop Oval Punch
  • Scrap Pile striped paper
  • Twinkle Toes Cricut Cartridge
  • Peachy Keen Critter Faces Stamp Set
  • My Pink Stamper Pinka-licious Stamp Set
  • Signo White Gel Pen
  • Stickles
Challenges:
Peachy Keen Stamps Let's Face it Friday Sew Super Cute Challenge 11
Flaunt It Fridays Ch #4 Twinkle Toes
Scraps 4 Fun Use your Scraps Challenge

Thanks for stopping by today and thank you to all of my followers.  I love hearing from all of you!  

Wednesday, February 16, 2011

Dancing Star

Quick Page using the Peachy Keen Challenge Sketch #45 and STARS for Die Cuttin Divas Challenge #3
 "I'm Seeing Stars"

Paper Me & My Big Ideas Ellen's School Days Pad
Solid CS and Ric Rack Ribbon Stampin' UP!
Glitter Paper and Red Ribbon from LSS
Plantin Schoolbook Cartridge
Peachy Keen Critter Faces Stamp Set

Monday, February 7, 2011

St Patty's Day Card, Hamster Card, Game Day Snack

Still in a funk today but I just keep crafting away.  I've been dying to use my new stamps from My Creative Time.  This stamp comes from her I Believe in Leprechauns set and I used the Paper Dolls cart.  This one is for the Mojo Monday 177 Contest. 
I was hoping it would get my "Mojo" going but its not quite there yet!  Oh well, there is always tomorrow! 
 I also wanted to post the cute little creature I made for my nephews birthday over the weekend.  I had to wait to post it until he got his card today because I didn't want my sister to see it!  This one was made with My Pink Stamper Stamps and Four Legged Friends Cart.

I do have a cute little story to share about our game day snack.  We are always asked to bring Buffalo Chicken Dip to every game, event, etc. at the cabin.  So last night I was mixing together the dish.  It is very easy, a pkg of cream cheese softened, a cup of ranch dressing, Franks Hot Sauce (I buy this in bulk and I am not sure how much I dump in but I think it may be around 8oz), about a cup of chopped celery, and a few grilled boneless/skinless chicken breasts or you can use a can or two of canned chicken. Throw it all together in a bowl, mix, bake at 350 for about 20 mins(until bubbly).  We dip tostitos in it!  I make it so often, that I can make it in my sleep!  Anyway, I did not have any chicken breasts in the freezer, so I asked my 4 year to go to the pantry and grab a can of chicken.  I love that I can do this now since she is starting to read.  I tell her to sound out the word and look at the cans.  So she comes back and hands me the can.  I opened it and had her drain it and throw it in as I'm mixing.  So as I'm mixing, I am looking at it thinking "this does not look right and it smells funny"!  OMGoodness!!!  I look at the can and she brought me "CHICKEN OF THE SEA"!!!  Needless to say, Tuna Buffalo Dip wouldn't go over well with the guys!!  My kids didn't mind having it for lunch today!  It wasn't that bad but for now on I plan on actually looking at the cans she brings me!!