Showing posts with label Cricut Simply Charmed. Show all posts

Tuesday, September 4, 2012

My Craft Spot Stamp Release Party Day 2 - Spooky Treats

Good morning everyone!  Day 2 of the week long Stamp Release Party at My Craft Spot!  Today we are sneak peeking another great stamp set!  This set is called Spooky Treats and what a SPOOKY set it is!  We LOVE Halloween at our house!  It is one of those holidays that we have so much fun being creative with fun decorations and special treats for our family and friends!  I used the fun Spooky Treats stamp set to create this years Halloween party invitations!  Here is my sneak peek for today!

I made a simple pocket on the invites by zig zag sewing around the edges and slide in a little ghost with our party info into them!  I finished them off with a strip of Smokey Black Crinkle Ribbon!

The little ghosts are cut from the Simply Charmed Cricut Cartridge, outlined in black pen and stamoed with a little Peachy Keen Face.  I love the font on the new Spooky Treats stamp set!  I stamped the ghost with "Stop by for a Spell" and the "Oct 31st" I stamp on a curve!  The "Time:" and "Place:" stamps are from last years My Craft Spot Halloween set Candy Corn Kisses. 

The "Happy Halloween" is also from Spooky Treats which I stamped, cut out using my oval spellbinders and outlined with a black pen.  My 5 year old said the ziggy lines make it look like it is wiggling...hehe!
 
All the pattern papers are from Making Memories Spooky Alley 8x8 pad.


I hope you enjoyed my sneak peek of the new Spooky Treats stamp set!  There are more amazing sneak peeks from Kimberly and the Design Team over at My Craft Spot and a chance to win a fun prize!  All the new sets will be revealed and available for purchase on Saturday along with our fun Blog Hop!  Thanks for stopping by today and please stop back again tomorrow!

Monday, June 18, 2012

My Craft Spot Monday Challenge #60 - Cool Treats

Hello Everyone!  It is time for another fun Monday Challenge at My Craft Spot!  This week's challenge is perfect for the hot summer days we are having!  This week we are challenging you to create a project with a Cool Summer Treat (ice cream, popsicles, etc.).  We are on a health kick this summer, so I went for a healthy Cool Summer Treat, Cold Juicy Watermelon....mmmmmm!!!

I used MME Oh La La for Her 6x6 paper and Simply Charmed Cricut Cartridge for this delicious card. 

I cut the paper lace using the Martha Stewart Lacey Border punch and stamped the My Craft Spot Sweet Sentiments Set #1 directly on the Snow White Crinkle Ribbon.


Please stop by this week and check out the other delicious Cool Treats the DT have created for your inspiration at My Craft Spot!  We hope you have fun playing along!  Thanks for stopping by today!


Products Used:
    • Sweet Sentiments Set #1
    • Snow White Crinkle Ribbon
  • Stampin' Up!
    • Cardstock
      • Soft Suede
      • Whisper White
    • Soft Suede ink
    • Dimensionals
  • Cricut E2 with Gypsy
    • Simply Charmed
  • MME 6x6 Paper
    • Oh La La for Her
  • Martha Stewart Lacey Border Punch
  • Singer Sewing Machine
  • Scotch ATG Adhesive
  • Archival Brilliance Pigment Ink
    • Graphite Black
  • Queen & Co Pearls

Monday, June 11, 2012

My Craft Spot Monday Challenge #59 - King of the Grill

Good morning everyone!!  I'm happy to be back to my blog after being MIA for a few weeks!  I'll have some special things to share with you soon but for now, we have a fun challenge going on over at My Craft Spot this week!!  This week we are celebrating all those special men in our lives just in time for father's day!  Our challenge this week is King of the Grill and we would like to see all those projects you are making for father's day! 

Since my father is no longer with us and my girls are making their own special projects for their daddy, I thought I would make a card thanking my hubby for being the best dad in the world!  He really is an awesome father and an even better husband and I couldn't imagine my life without my best friend!  He is also obsessed with his grill, so here is the card I made!

 The little tag is from My Craft Spot's Tiny Tags Stamp set and the bakers twine is Lemon Drop also available at My Craft Spot.  I used the burger from Simply Charmed (he is so cute) and I sponged it then layered it with dimensionals.

I used my sewing machine to stitch a border around the MME background paper before adhering it to my card base then randomly added some scraps of paper/cardstock.

Make sure you stop by and check out the rest of the AMAZING King of the Grill DT projects at My Craft Spot this week and share your Father's Day projects with us for your chance to win a fabulous prize!  Thanks for stopping by today!


Products Used:
    • Lemon Drop Bakers Twine
    • Tiny Tags Stamp Set
  • Stampin' Up!
    • Cardstock
      • Soft Suede
      • Crumb Cake
      • Pacific Point
      • Chocolate Chip
      • Real Red
      • Old Olive
      • Pretty in Pink
    • Dimensionals
  • Cricut E2 with Gypsy
    • Simply Charmed
  • MME 6x6 Paper
    • Quite Contrary Jack & Jill
  • Singer Sewing Machine
  • Scotch ATG Adhesive

Friday, February 3, 2012

My Craft Spot Valentines Stamp Release

Hello Everyone!  Today is finally my day to showcase the new stamps over at My Craft Spot...WooHoo!!  I've been having so much fun playing with them and mixing them into my projects!!  I worked on all these projects away from my scrap room with limited supplies, so many of them are simple (no sewing this time) but I do love how they came out!  Here are the new stamps if you haven't seen them yet!

I have to say that the Build A Valentine is my fav!  I've been using it on everything from Valentines Day projects to Birthday Cards!  This is going to be long so I'll try not to chat too much! 

 
I wanted to make a Cricut card for all my Cricutee friends out there (yes I am making that a word...hehe)!

 
I knew when I saw these Conversation Hearts last year that I needed the Simply Charmed cartridge!  I've used that cart like a maniac since and I knew they had to be the first Valentines project this year!
 
The stamps are both from the new Always & Forever set and the twine is the new yummy Valentine Twist  both available at My Craft Spot

 
The embossing folder, punch and cardstock are all from Stampin' Up! 
 
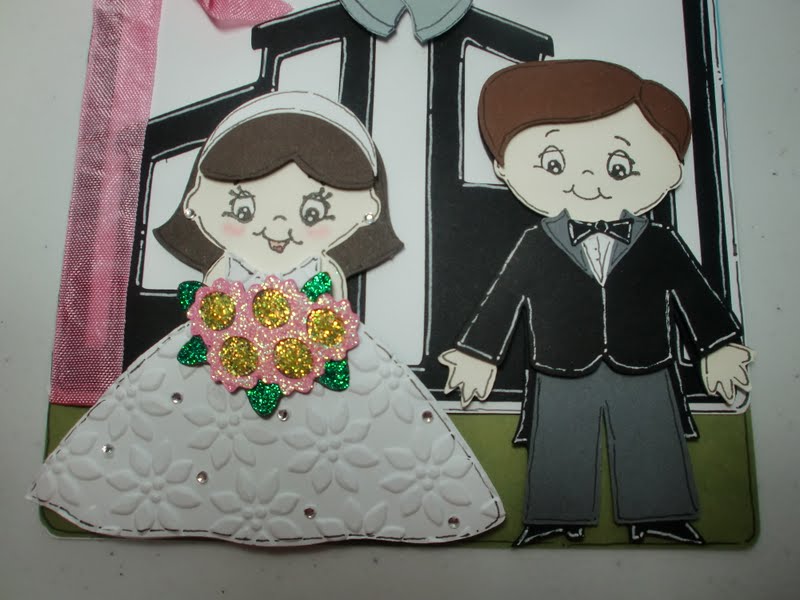
Next up is the card I made for the inspiration of all my Digi friends (and Twilight Fans)! 
 
What is Heart Day without a little Edward and Bella......hmmmmmm!!  They are actually Dressy Ed and Dressy Camille digis from The Greeting Farm!  Aren't they the cutest!?!  Again, I used the Always & Forever Set and some Black Seam Binding both from My Craft Spot
 
I'm also using one of the new Bitty Bags as the envie for this one!  I thought the black polka dot looked great with the MME Oh La La for Her paper pad!
 
Ok, one last card with just my stamps and punches!  No machinery needed!
 
This stamp reminded me of the love notes we used to pass around in junior high!!  I used some Rusty Red Seam Binding and tied on a little Valentine Twist Bakers Twine Bow!  The little Valentine Bauble is K&Co! 

 
All the cardstock and punches are SU!  I of course needed to add some doodles to my little love note!!!  Brings back memories!
 
So, what do you think so far?  I know, they are all missing my sewing machine!  Well I can't end there with just a few cards!  I have one more project to share with you so bare with me here!
 
What is Valentines Day without some little treat bags!  I love how cutely the Build a Valentine stamps went with these adorable images from TiddlyInks!

 
This little guy is Little Hopper!  I added some glossy accents to the eyes to make them shine!

 
Little Squeaker is such a Cutie Pie!!  I added a little glossy to her bow!

 
Little So and So went so perfectly with the new "Dino-mite!" stamp, don't you think!?!  I added some glossy to his spikes! 

 
I saved the best for last!  This is sweet Little Bear!!  He is soooooo cute!  I would love for him to "Be Mine"!  I added some glossy to his little nose!

 
These are all little brown bags that I simply covered with cardstock (SU).  I stamp the CS with the SU Sprinkles stamp (retired) to get a patterned look and inked all the edges (I realized after getting home from my crop weekend with them, that I could have just used the new stamp sets to make the pattern effect, each set has a collection of tiny heart stamps!!)  The little Martha Stewart Lacey Punch border was a last minute addition to these little treats.

 
Each little bag has a coordinating Crinkle Ribbon handle to finish them off! 

GIVEAWAY TIME
  • Kimberly is giving one lucky follower of mine their choice of one of stamp set.  
  • You can choose ANY STAMP SET BY MY CRAFT SPOT!!!  
  • To qualify, be a follower of My 3 E Scrapbooking and leave a comment on this post.  
  • Make sure you check out all the stamps at My Craft Spot and let me know in your comment which one you would want for your prize! 
  • I will announce the winner on Monday Feb 6 so stop back to see if you've won!!!  

The entire DT has been taking turns at My Craft Spot showcasing the new sets!  They are all sharing some amazing projects, so be sure to stop by and be inspired!  Thanks for stopping by today and good luck!

Saturday, August 13, 2011

Back to School Blog Hop

Hello Everyone and welcome to the Back to School Blog Hop Hosted by the talented Jovan at Cards by Jovan!  If you arrived here from Girlia's blog then you are heading in the right direction.  She is so creative, isn't she?  If you just stopped by to see me today (thanks) then you'll want to go back to Jovan's blog to start at the begining, you won't want to miss a stop!  There are so many talented blogs in this hop, blog candy to be won and there's also a fun challenge at the end too!  I hope you'll join us!
 I am so excited for Back to School time!  As much as I love the fun summer brings, I also love the structured schedule of the school year (yes, it is part of my OCD, I need my schedules) and I LOVE fall!  This year is very special because my Oldest E is heading to Kindergarten.  As much as I'll miss her, I know she is going to LOVE Kindergarten and I know she'll thrive there!   I am also a preschool teacher, so I can't wait to meet the new students and to see the kiddos who are returning!  Such an exciting time and who doesn't love NEW SCHOOL SUPPLIES!  There is nothing like fresh crayons and un-sharpened pencils....hmmmm!!! 


For my Back to School Project, I decided to make a gift for my girls to give to their Auntie K for her classroom (she is not really their aunt but that is what they call her). 

I had seen these at a local craft show a few years ago and thought they were soooo cute!  I made a few of them last year for Christmas gifts and they were all well received!    They are such a cute addition to any classroom and very easy/inexpensive to make! 

I've seen the crayon wreaths in many sizes and colors but here is how I made mine.  I started out with a 6" and 8" hoop.  I've made them bigger before but I like this size the best!  You get two wreaths out of these hoops! 

I used two boxes of 24ct crayons on this size wreath (minus the neutral colors).  I started out by lying the crayons in a pattern where I wanted them.  Then I hot glued them to the hoops.

After adhering all the crayons, I tied ribbon around to hide the hoops.  At Christmas time I think I used red ribbon.  I really like the green better, but then green is my favorite color too!   

Once the wreath is wrapped I added a hanger ribbon, a large bow and some fun decorations!

I cut a chalkboard, personalized it, added a little bookworm with a Peachy face (I'm sorry, I know I use this little worm way too much, but I can't help it...he's too cute) and a rolled piece of white for the chalk.

A little school bus from Doodlecharms with a "hello" stamp from My Craft Spot.

The glue is from Simply Charmed and the scissors are from Locker Talk.  I hope you like my crayon wreath!  They are very easy to make and can be decorated to fit anyones classroom style!  You could always make it with pencils to be more fitting for a Middle/High School Teacher too!

So, who wants some blog candy?  I have an assortment pack of 8.5 x 11" Stampin' Up! cardstock that I think includes the colors Marina Mist, Crumb Cake, Cherry Cobbler, Early Expresso, and Daffadil Delight.  I was going to include the bottle of Stickles too, but my little darlings got a hold of it today (that was a fun mess, sorry for the teaser picture).  I'm sure I'll find something else to throw in there by time I pull a winner!


BLOG CANDY RULES
1. You must leave a comment telling me what Back to School means to you.
2. You do not need to be a follower, but I would love if you were!
3. Because I love my friends (aka followers), followers may have an extra entry by adding a second comment letting me know that you are a follower (old and new)!
4. You must stop back on Monday Aug 15 to see if you won!

I have taken enough of your time today.  Thank you Jovan for hosting this fun hop today!  There are so many more wonderful Back to School projects to see, so have fun and thanks for hopping by today!  Your next stop is my talented friend


Here is the entire line up in case you get lost along the way!
Jovan  
Cindy   

Amy  

Girlia   

Amber   You are here

Jayne   NEXT STOP

Adrain   

Sherrie K   

Amanda   

Melissa  

Theresa   

Amber  

Carri  
Jovan   to participate in the Back to School challenge!!

Back to School Blog Hop

Products Used:
  • 2 pks of Crayola Crayons 24ct box
  • 6" cross stitch hoop
  • 8" cross stitch hoop
  • Ribbon from Michael's
  • Stampin' Up! Cardstock
  • Create A Critter Cricut Cartridge
  • Doodlecharms Cricut Cartridge
  • Locker Talk Cricut Cartridge
  • Simply Charmed Cricut Cartridge
  • My Craft Spot Sweet Sentiments Set #1
  • Peachy Keen Critter Faces
  • Crystal Effects
  • Stampin' Write Markers
Challenges:

Thanks for stopping by today!  Have a great weekend!

Wednesday, August 10, 2011

Whimsical Wednesday Challenge #18 - Back to School

Hello everyone!  It is wednesday and time for another Whimsical Wednesday challenge!  This week, Faith- Abigail chose our fun challenge, "Back To School"!  Create any type of project that has to do with school (no cards this week). Examples are-organizers, teachers gifts, book marks, decorated binder clips, you get the picture!  Stop by the Whimsical Wednesday designers for some inspiration!   They are all so talented!  Here is what I came up with for some inspiration today!

I made a few little "Back to School" gifts for my daughter and her friends who are heading to Kindergarten in a few weeks!  I'm going to fill them with these cute mini hand santitizers from Bath & Body Works!  I thought they would make a nice addition to their lunch boxes!
  
I started out with these little candy bags which I order in bulk from the local Candy Co.

I added scraps of school pattern paper to the bag fronts.  I cut a cute little box of crayons from Simply Charmed and popped it up.  Then I added each of the kids names to their bags!

Quick little cards for in the bags!  I'm not sure who makes these stamps (or if they are even mine, they must be my moms) but they are cute and perfect for the kiddos 1st day of school!

I also thought it would be cute to turn them into little backpacks!  I love how they turned out and I'm sure the kids are going to love their fun little "Back to School" gifts too!

So, what kind of fun "Back to School" projects do you have on your to do list?  We would love to see them this week at the Whimsical Wednesday challenge blog!  You have two weeks to link up your projects and remember that you still have a week to link up to the "Sense of Humor" scrapbook challenge!  Thanks for stopping by!

Wednesday, June 15, 2011

"Going to the Chapel and We're Gonna Get Married" Card

I needed a card for an upcoming wedding.  They are a younger couple so I wanted something fun!  I love when I make a card that puts a smile on my face, especially this week!  While making this card, I could not stop singing "Going to the chapel and we're gonna get married" (Click HERE if you would like to get the song stuck in your head too)! 
I used Inspired Hearts Cartridge for the background and Simply Charmed for the bride and groom.  I do not have a cart with bells so I made my own with a scrap of silver shimmer paper.

The card front is mostly black and white with a splash of pink (their wedding color).  The blue and green that you can see are on the inside of the card.  I used my Gypsy to stretch the background piece from Inspired Heart and then welded it to the front piece.

The bride and groom both have a few layers pieced with dimensionals and I gave them each a Peachy face!

The bride's dress is embossed and I added little rhinestones.  I also gave her a set of earrings and used stickles to make her bouquet sparkle.

Here you can see a little of the dimension and you can see how the happy couple are free standing on the front of the card.

Products Used:
  • Stampin' Up!
    • Tempting Turquiose Cardstock
    • Old Olive Cardstock
    • Whisper White Cardstock
    • Basic Black Cardstock
    • Gray Cardstock
    • Basic Black Classic Ink
    • Pastels (cheeks)
    • Petals A Plenty Embossing Folder
    • Dimensionals
  • Cricut E2 and Gypsy
    • Inspired Hearts Cartridge
    • Simply Charmed
  • My Craft Spot
    • Pink Bubblegum Hand Dyed Crinkle Ribbon
    • Click (HERE) to order
  • Peachy Keen Stamps
    • Wide Eyed Kids Stamp Set
  • My Pink Stamper
    • Pinka-licious Puns Stamp Set
  • Recollections Rhinestones
  • Journaling Pen
  • Signo White Gel Pen
  • Stickles
Challenges:
FCCB Challenge Me Monday #64 Wedding Include White and Bells
Die Cuttin Divas Challenge 19 Wedding Bliss Card with No Hearts

Thanks for stopping by!